Hardware and firmware settings
Last modified: 16 January 2026
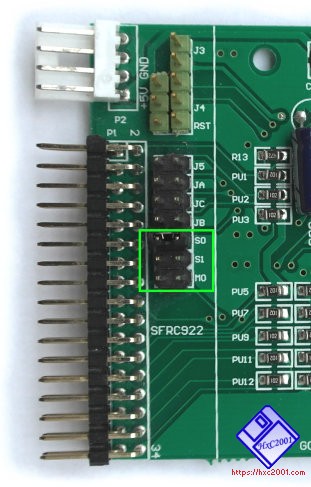
Gotek floppy emulator jumper setting
The only jumper to set is the drive ID / select line input : This can be set to "S0", "S1" or "MO".
Generaly for PC compatible machines the jumper to set is "S1". For Shugart compatible machines this is S0 or S1 for the second drive.
|
Important
|
With this firmware the only valid jumpers positions are "S0", "S1" and "MO". It is important to remove all others jumpers if present. The others pin/"jumpers" positions are now used by others functions/features (extra buttons, rotary, screen…). |
HxC Floppy emulator firmware settings
Many parameters and settings that can be modified. You generally don’t have to change them as the default values are fine in most cases. Anyway if needed, these settings can be changed with the internal menu.
To access the setting menu, remove the USB stick and press both buttons. Then you can navigate through the various available options. This menu is available with LCD/OLED/OSD and 7 Segments Gotek drive.
The file selectors have also a setting page that can be used to change these parameters.
OLED/OSD/LCD Gotek Menu

-
To access it, remove the USB Stick and press both buttons.
-
Choose the menu - press select or wait some seconds for the selection validation.
-
Check and/or change the setting - press select or wait some seconds for the selection validation.
-
Select "exit" to leave the sub menu and menu.
The new setting is then saved into the device.
Here is some of the available parameters :
-
User interface : Force the usage mode (Normal/Indexed/Autoboot).
-
System Family selection : Help the firmware to identify correctly some disk image file formats.
-
Floppy Interface mode : predefined modes and custom modes.
-
Bitrate : To force the bitrate.
-
Track Step : Single or Double step track mode.
-
Emulation Bitrate (Auto or forced).
-
Floppy write protect state.
-
Settling time : To force/change the default head settling time.
-
Drive B : Enable/disable the second drive emulation (Currently disabled in the firmware)
-
Step Sound output setting.
-
Sound volume setting.
-
LCD Backlight/OSD timeout setting.
-
OLED contrast.
-
OLED polarity (white or black background).
-
LCD/OLED characters per line setting (16/18/20/21 or 40 characters per line).
-
OSD screen position.
-
Rotary setting.
-
Select Button emulation (on/off and timeout setting)
-
Emulator standby delay
-
System monitor : Gotek CPU and power supply voltage.
-
OLED reset delay : To delay with some bad OLED screen…
-
Soft version : Shows the installed version.
-
Clear settings : To clear/reset all the settings.
|
Note
|
To clear/reset all settings to the default values, press the Gotek’s right button at power up during 5 seconds. |
Original 7 Segments Gotek Menu
-
To access it, remove the USB Stick and press both buttons.
-
Choose the sub menu number - wait some seconds for the selection validation.
-
Check and/or change the setting - wait some seconds for the selection validation.
The new setting is then saved into the device.
Here are current menus and sub-menus definition :
Menu 0 - System family selection
This setting help the firmware to identify correctly some disk image file formats.
00 = AUTO (DEFAULT)
01 = Amiga
02 = Acorn
03 = Atari ST
04 = IBM PC AT/XT
05 = Camputer Lynx
06 = Commodore 1581
07 = Thomson
08 = x68000
09 = SAMCOUPE
0A = MSX
0B = Spectrum
0C = Akai
0D = Casio
0E = Emax
0F = Ensoniq
10 = General Music
11 = Korg
12 = Ensoniq ASR10 (Ensoniq Auto DD & HD support)
13 = Opus Discovery
14 = TI99/4A
15 = Robox RC9400
16 = Kawai
17 = Yamaha QX3
18 = User defined
19 = Roland
1A = BAS
1B = E-mu ESI/EOS
Menu 1 - Interface mode
00 = AUTO (DEFAULT)
01 = IBM PC DD
02 = IBM PC HD
03 = ATARI ST DD
04 = ATARI ST HD
05 = AMIGA DD
06 = AMIGA HD
07 = CPC DD
08 = GENERIC SHUGART DD
09 = IBMPC ED
0A = MSX2 DD
0B = C64 DD
0C = EMU SHUGART
0D = S950 DD
0E = S950 HD
0F = S900/S950 (Density Auto)
10 = PC DD/HD (Density Auto)
Menu 2 - Write protect mode
00 = AUTO (DEFAULT)
01 = Write protected.
02 = Write enabled.
Menu 3 - Double Step
00 = AUTO (DEFAULT)
01 = Single step
02 = Double step
Menu 4 - User interface mode
00 = AUTO (DEFAULT/From Config file)
01 = Normal mode
02 = Indexed mode
03 = Autoboot/selector mode
Menu 5 - Auto select delay
01-08 : Delay (number of seconds).
Menu 6 - Head settling delay
00-30 : Delay (number of milli-seconds).
Menu 7 - Rotary type
00 = 1 increment per step rotary.
01 = 2 increments per step rotary.
02 = Disable.
Menus 8<→E : Not currently assigned
Menu F - Display firmware version
|
Note
|
To clear/reset all settings to the default values, press the Gotek’s right button at power up during 5 seconds. |
Built-in default parameters
Last modified: 16 January 2026
| HxC Floppy Emulator project | Legal Mentions | (C)2006-2026 HxC2001 / Jean-François DEL NERO |