Troubleshooting
Last modified: 03 June 2026
If you are encountering some troubles and installation issues, don’t panic !
Someone has likely encountered the same issues before and it can easily be solved.
You can find below some typical issues and solutions to solve them:
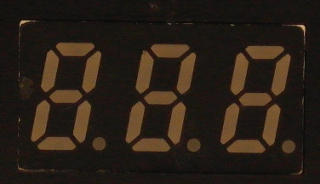
Gotek drive with 3 digits 7 segments display:
This doesn’t work ! : The display doesn’t work at all
Check that you have removed the BOOT0 strap after the bootloader programming.
|
Note
|
Unlike the seven segments screen, OLED and LCD screens will remain blank until you have fully installed the firmware/upd file. After the bootloader installation you need to copy the latest firmware UPD file present into the firmware archive to a MBR/FAT32 formatted USB stick and insert it in the Gotek. The OLED/LCD screen will be initialized some seconds later right after the firmware installation. |
This doesn’t work ! : I only see "LDR" on the display
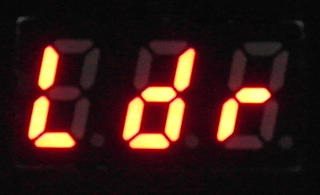
This is the bootloader banner. You should see it when you press both buttons at power up to update the firmware. If you always see this message, you probably still have to finish the firmware installation process : Copy the latest firmware UPD file present into the firmware archive and insert the USB stick.
This doesn’t work ! : I see "Nor" on the display when inserting the USB stick

The emulator is in "NORmal mode".
Since you don’t have any OLED or LCD screen, you need to use the indexed mode or the "autoboot"/file selector mode if you have an Amiga/Atari ST/CPC.
In indexed mode you must use the indexed config file and name the files images DSKA0000.XXX, DSKA0001.XXX, DSKA0002.XXX (replace XXX by the original file extension.)
In "autoboot"/file selector mode you must use the "autoboot"/file selector config file and the autoboot.hfe available for your machine. The images selection is done with a file selector software (autoboot.hfe) to set the "slots" (supported on Atari ST, Amiga, CPC).
The HXCSDFE.CFG config files and autoboot.hfe files are in the firmware archive.
This doesn’t work ! : The machine can’t read the disks. The Gotek green LED is permanently lit (no flashing) and/or i can read "rib" at power up on the display
"The floppy image appears to be loaded by the emulator, but the machine can't read the disks. The Gotek green LED is permanently lit (no flashing) and/or i can read "rib" / "reversed floppy ribbon" at power up on the display*"
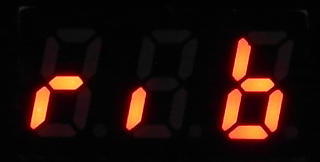
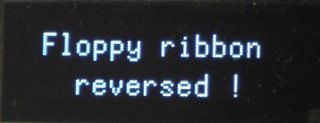
The floppy ribbon is probably connected to the wrong way. Try to reconnect it to the other way.
Explanation : A wrongly connected floppy ribbon force the drive selection by short-circuiting the floppy signals to the ground, and make the selection LED always lit. Of course the machine can’t communicate with the emulator in such situation. Be aware that with some machines the floppy ribbon coloured wire is NOT the pin 1 !
This doesn’t work ! : The Gotek green LED is permanently off (no flashing) and the system doesn’t find the drive/can’t read any disk
"The floppy image appears to be loaded by the emulator, but the machine can't read the disks. The Gotek green LED stay off (no flashing) and the machine reports some missing drive / missing floppy disk related errors *"
If the floppy ribbon is correctly connected this may be a jumper related issue : Try to set the S0, S1 or MO jumper positions. Also please remove any others jumpers present on the board ! (No jumper on JA, JB, JC !)
Please note that the usage of a twisted floppy ribbon can change the jumper setting to use and the drive position in the system (A: or B:) !
The issue can also be related to the the interface mode. Some machines required PC interface mode drive, some others Shugart compatible drive and so on. Please check the Embedded configuration interface/menu. to change the interface mode.
You can find the machines settings in the * Compatibility list, the jumper settings and interface mode to use are present in the description.
In case of doubt the interfaces to test are : "GENERIC SHUGART", "IBM PC DD", "IBM PC HD", "S950 DD" and "S950 HD"
The OLED screen is black/doesn’t work !
If you are sure about the OLED wire connections, try to reset the Gotek : Shutdown the machine, press the Gotek’s right button, switch on the machine and keep the button pressed during ~5 seconds. This will clear the internals settings and force the long screen detection process. Some OLED screens with factory defects need this to be detected properly the first time.
|
Note
|
Unlike the seven segments screen, the OLED and LCD screens will remain blank during a firmware update / when the gotek is in the bootloader. The OLED/LCD screen will be initialized right after the firmware update / upd file installation. |
The floppy emulator doesn’t seem to have any reaction when i insert a USB stick
"I see *no* activity on the memory stick (no flicker), no flicker of change on the gotek. I have tried both with USB stick in before powering on, and with plugging it in after powered on. I have tried everything from an old 256M stick to newer USBs. I have formatted to fat using Linux, windows... it is like the device isn’t even recognized..."
If the drive doesn’t seem to react to any USB stick and stay on the "Ldr" or the "hXc" banner, please try another power supply : The USB sticks need a proper 5V power supply to work. For example, during the flash/firmware installation some serial adapters don’t deliver enough power/voltage for the USB stick.
I tried to update the firmware but i get an E01 error code !
"I’m confused with the instructions. I have a Gotek. It already had a vendor installed version of the software. I put the latest HxC firmware update upd file to the stick but when trying to update normally, I get a E01 error. What is going on ?"
This means that you don’t have the HxC bootloader installed but a default firmware on this Gotek. If you got the "E01" error you can install easily the HxC bootloader with an usb stick. No need to remove the drive from the machine nor open the Gotek.
Firmware installation issue : When i follow the EXCHANGE.BIN procedure, i got the "883" message on the screen
"883" means "EXCHANGE.BIN is invalid." The file is corrupted.
When copying the exchange.bin file from a PC or Mac computer to your USB drive, remember to properly eject the USB stick. If the problem persists, try again with a different USB stick.
Also, check the power supply to your Gotek.
Please also note that an exchange.bin is only valid one time. You need to regenerate a new one if you power cycle the gotek during the installation process.
More tips and informations
|
Important
|
With this firmware the only valid jumpers positions are S0, S1 and MO. It is important to remove all others jumpers if present. The others pin/"jumpers" positions are now used by others functions/features (extra buttons, rotary, screen…). |
Seven segments message codes
-
hXc : Default HxC banner
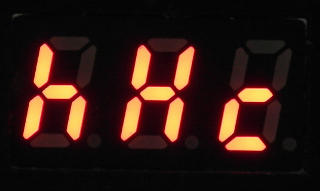
This banner should disappear when a USB stick is inserted. If the emulator always shows "hXc", try another USB stick and check the power supply voltage level (should be between 4.5V and 5.5V).
-
NFL : No file image found on the USB stick
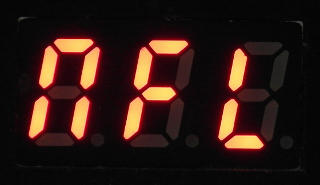
You need to copy some file images and a config file to the USB stick. See the indexed mode or the "autoboot"/file selector mode or the the emulation from partitions
-
Err : File image loading error (Not found or corrupted or unsupported)
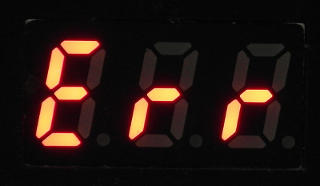
In indexed mode check that the file images names are respecting the indexed mode naming convention. Also check that the disk image file format you are using is supported by the firmware..
-
FAt : FAT error
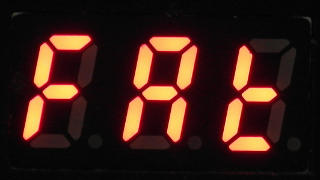
Check that the USB stick is formatted in FAT (FAT12, FAT16 or FAT32). If needed reformat it in FAT32. NTFS, EXT3/4 and exFAT are currently not supported by the firmware.
-
Ldr : Firmware update mode
This is the bootloader banner. You should see it when you press both buttons at power up to update the firmware. If you always see this message, you probably still have to finish the firmware installation process : copy the latest firmware UPD file present into the firmware archive and insert the usb stick.
-
Nor : Normal mode
The emulator is in "NORmal mode".
Since you don’t have any OLED or LCD screen, you need to use the indexed mode or the "autoboot"/file selector mode if you have an Amiga/Atari ST/CPC.
In indexed mode you must use the indexed config file and name the files images DSKA0000.XXX, DSKA0001.XXX, DSKA0002.XXX (replace XXX by the original file extension.)
In "autoboot"/file selector mode you must use the "autoboot"/file selector config file and the autoboot.hfe available for your machine. The images selection is done with a file selector software (autoboot.hfe) to set the "slots" (supported on Atari ST, Amiga, CPC).
The HXCSDFE.CFG config files and autoboot.hfe files are in the firmware archive.
-
qd : Quickdisk firmware
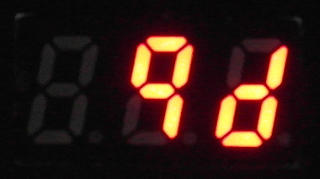
You have the QuickDisk firmware installed. If this is not what you want, update the firmware to the normal version.
-
cFG : Bad/corrupted/unsupported config file
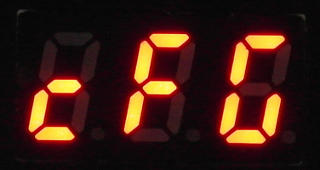
The HXCSDFE.CFG configuration file is corrupted or not supported. Overwrite it with one of the HXCSDFE.CFG present in the firmware archive.
-
rib : Ribbon connection issue
The floppy ribbon is probably connected to the wrong way. Try to reconnect it to the other way.
The equivalent message with OLED screens is "Reversed Floppy Ribbon"
Last modified: 03 June 2026
| HxC Floppy Emulator project | Legal Mentions | (C)2006-2026 HxC2001 / Jean-François DEL NERO |