HxC bootloader installation
Last modified: 22 February 2025
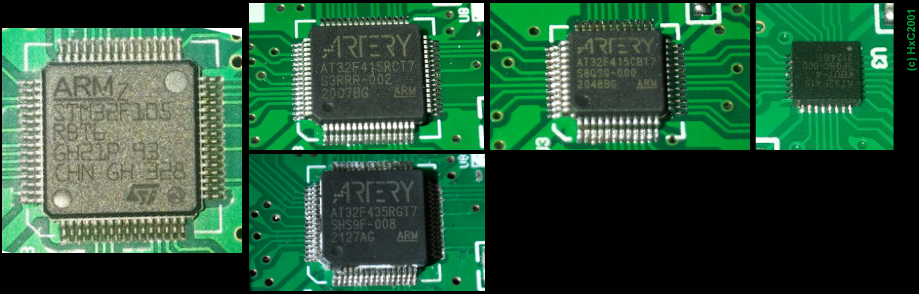
The HxC bootloader is needed to install the HxC floppy emulator firmware for Gotek. The HxC bootloader can be installed with the following methods the ARTERY AT32 and STM32 Gotek floppy emulators :

Serial TTL cable flash method
Prerequisites :
-
A STM32 or an ARTERY AT32 based floppy emulator hardware to flash (Gotek or clones…).
-
A PC under Windows connected to Internet.
-
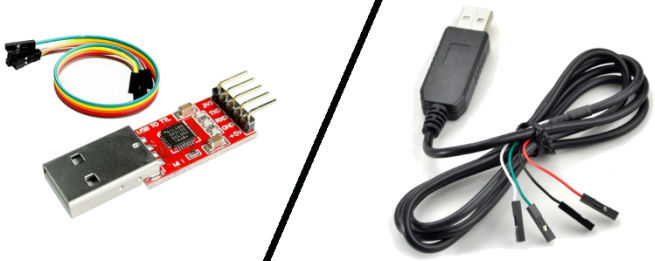
Any 3.3V TTL serial cable to connect the Floppy Emulator hardware to the PC.
-
Your account information. You can purchase the firmware and get the account on this page : https://hxc2001.com/store/
STM32 / ARTERY AT32 Based hardware bootloader Downloader and Flasher :
This software allows you to download and program the STM32 / AT32 HxC bootloader into a STM32 / AT32 based floppy emulator hardware. (Typically these "Gotek" drives and clones or the next STM32 / AT32 HxC Floppy emulator units).
|
Note
|
This Flash procedure is only needed once time per device since the STM32 / AT32 HxC bootloader will allows you to update the device with a simple USB stick. |
Procedure to Flash the device :
-
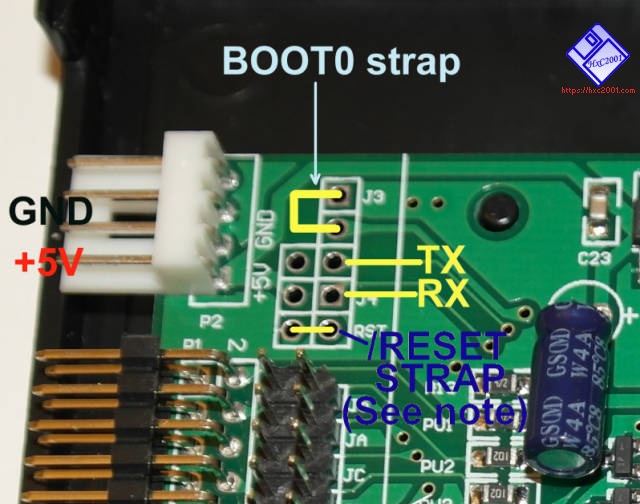
Set the BOOT0 signal to the VCC3V3 on the device. (Add a connection between "J3" and the VCC3V3 pin. See below).
-
Connect your serial adapter to the device and to the PC. (GND,RX,TX,+5V) Note 1: To power the device, you can use a external +5V source or the +5V coming from your USB adapter. Note 2: Cross connect your serial adapter to the device : TX wire to the RX pin, RX wire to the TX pin.
-
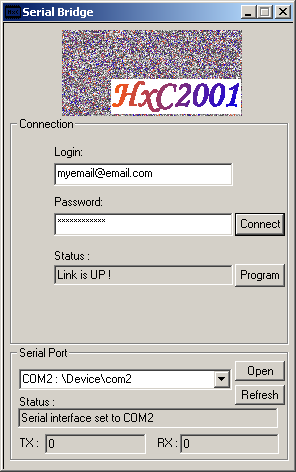
Start the SecSerialBridge software and select the COM port of your serial adapter. Click on the button "Open"
-
Enter your account login / password. Click on the button "Connect". If the connection to the server succeed you will get the "Link is UP !" status.
-
Some seconds later you should get the "Device detected." status. Note : If you don’t get it, try to reset the STM32 / AT32 by making a short connection of the reset signal (RST) to GND.
-
Once the device is detected, you can press the "Program" button. The download and programming process finish with a "Done !" Status. The whole process take some minutes.
Once done, remove all the connections previously done on the programming pins.
The device should now display "Ldr" at power up and wait for a USB flash drive with a UPD file to use. You can download these files on the HxC website.
|
Note
|
Unlike the seven segments screen, the OLED and LCD screens will remain blank until you have fully installed the firmware/upd file. After the bootloader installation you need to copy the latest firmware UPD file present into the firmware archive to a MBR/FAT32 formatted USB stick and insert it in the Gotek. The OLED/LCD screen will be initialized some seconds later right after the firmware installation. |
Programming connector
The Programming connector is near the power input connector. (SFRC922,SFRC526,…)
 ----------------------------
 |
-+--- NC
-+--- GND      O J3 (BOOT0)
-+--- GND      O VCC3V3
-+--- +5V     OO TX
 |        +5V OO RX
 |        GND OO RST
 |--
 |  |
 |  |
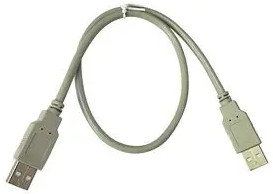
USB-A<>USB-A / Type A to Type A cable flash method
Prerequisites :
-
A STM32 or an ARTERY AT32 based floppy emulator hardware to flash (Gotek or clones…).
-
A PC with the STM32 Dfuse or the ARTERY tool software installed
-
A USB-A USB-A/Type A to Type A cable
-
Your account information. You can purchase the firmware and get the account on this page : https://hxc2001.com/store/
-
Send an email to have the needed dfu file. (New - October 2021 : The process is now fully automated :). An 10 minutes response time automated email address is provided for the Gotek installation ).
Procedure to Flash the device :
-
Copy the EXCHANGE.BIN and the last HxC firmware version (HxCFEUSB_V3_X_X_Xa.UPD…) files to the root of an empty usb stick. (formatted in FAT32)
-
Insert the usb stick into the drive.
-
Once you got "001" displayed, remove the usb stick (Don’t switch off the emulator !)
-
Send back the file EXCHANGE.BIN from the USB stick to the automated email address.
-
Wait feedback email (response time : ~ 10 minutes) (And again don’t switch off the emulator ! ). Once received, overwrite the EXCHANGE.BIN file present on the stick with the one you have received.
-
Insert the Stick in the emulator. The counter should pass to "000" → "002" and then "003" ("003" means that the HxC Bootloader installed) After this the HxC firmware is installed automatically from the upd file ("Ldr" message) and ~10 seconds later you should see the HxC firmware message "HxC" or "Nor" on the 7 segments screen.
USB stick flash method
The USB stick method is available on some Goteks. The method is similar to the USB-A USB-A/Type A to Type A cable flash method without the need to use any cable or software.
Unfortunately this is only possible with Goteks with a preinstalled bootloader and the factory firmwares doesn’t have any bootloader so far…
Currently if your Gotek shows "FF" or "FlashFloppy" or something similar when no usb stick is connected, then there is a bootloader and you have the possibility to install the HxC firmware with just a USB stick, no need to use any cable. If the Gotek is already in the machine, no need to open the machine either. The installation is quite easy and fast in this case.
Please contact us in case of doubt to figure out if your Gotek supports this method.
(New - October 2021 : The process is now fully automated :). An 10 minutes response time automated email address is provided for the Gotek installation ).
Last modified: 22 February 2025
| HxC Floppy Emulator project | Legal Mentions | (C)2006-2025 HxC2001 / Jean-François DEL NERO |